Dashboard overview
For busy service professionals, this screen answers the most important daily questions quickly: What needs attention now? Are bookings moving forward? Is revenue growing? Is the system healthy enough to trust?
- Last updated: March 30, 2026
- Reading time: 4 minutes
- Difficulty: Beginner
Why this matters: Your ConsultGen dashboard is the control center for your appointment scheduling software. It gives you a live view of the booking lifecycle, so you can spot pending work, track revenue, measure customer growth, and confirm that your automated booking system is connected properly.
For busy service professionals, this screen answers the most important daily questions quickly: What needs attention now? Are bookings moving forward? Is revenue growing? Is the system healthy enough to trust?
How to review your dashboard in 6 steps
-
Confirm the organization and date range. Check the organization name in the sidebar, then set the date filter to a useful period such as the last 30 days or a custom week.
This keeps every chart and KPI aligned with the business view you actually want.
-
Scan the KPI cards. Review Total Appointments, Approved, Pending, Revenue, Customers, and Staff Members.
Use this pass to measure demand, workload, team capacity, and overall booking performance.
-
Act on pending bookings. If pending appointments are high, open Bookings and review requests immediately.
Fast approval keeps the booking lifecycle moving and reduces drop-off.
-
Review the charts for trends. Compare approved versus pending appointments, revenue trends, and new-customer growth over time.
Totals show what happened. Trends show whether the system is improving or creating friction.
-
Verify system health. Check Active Licenses, Connected Calendars, Bookings in range, and Success Rate.
This confirms your numbers reflect real business activity instead of setup problems.
-
Plan the next action. Use the Subscription, Quick Start, and Admin Status cards to decide whether you should finish setup, update billing, add staff, or upgrade your plan.
Navigation: Getting around ConsultGen
The left sidebar is your working menu.
- Dashboard returns you to the overview.
- Bookings is where you review and manage appointment requests.
- Services defines what clients can book.
- Staff manages availability and assignments.
- Widget controls the booking form your clients see.
- Licenses manages your subscription seats.
- Connections handles calendar and external integrations.
- Settings controls business details, notifications, payments, timezone, and business hours.
The organization switcher at the bottom of the sidebar matters if you run multiple locations or brands. Always confirm you are working in the right account before acting on the numbers.
The dashboard header: filtering your view
The welcome message confirms which account you are viewing. The date range filter controls every KPI and chart on the page. If your numbers look wrong, check the date range before doing anything else.
- Use a custom date range when you want to audit a campaign, payroll period, or specific week.
- Use Last 30 days for a fast operating view.
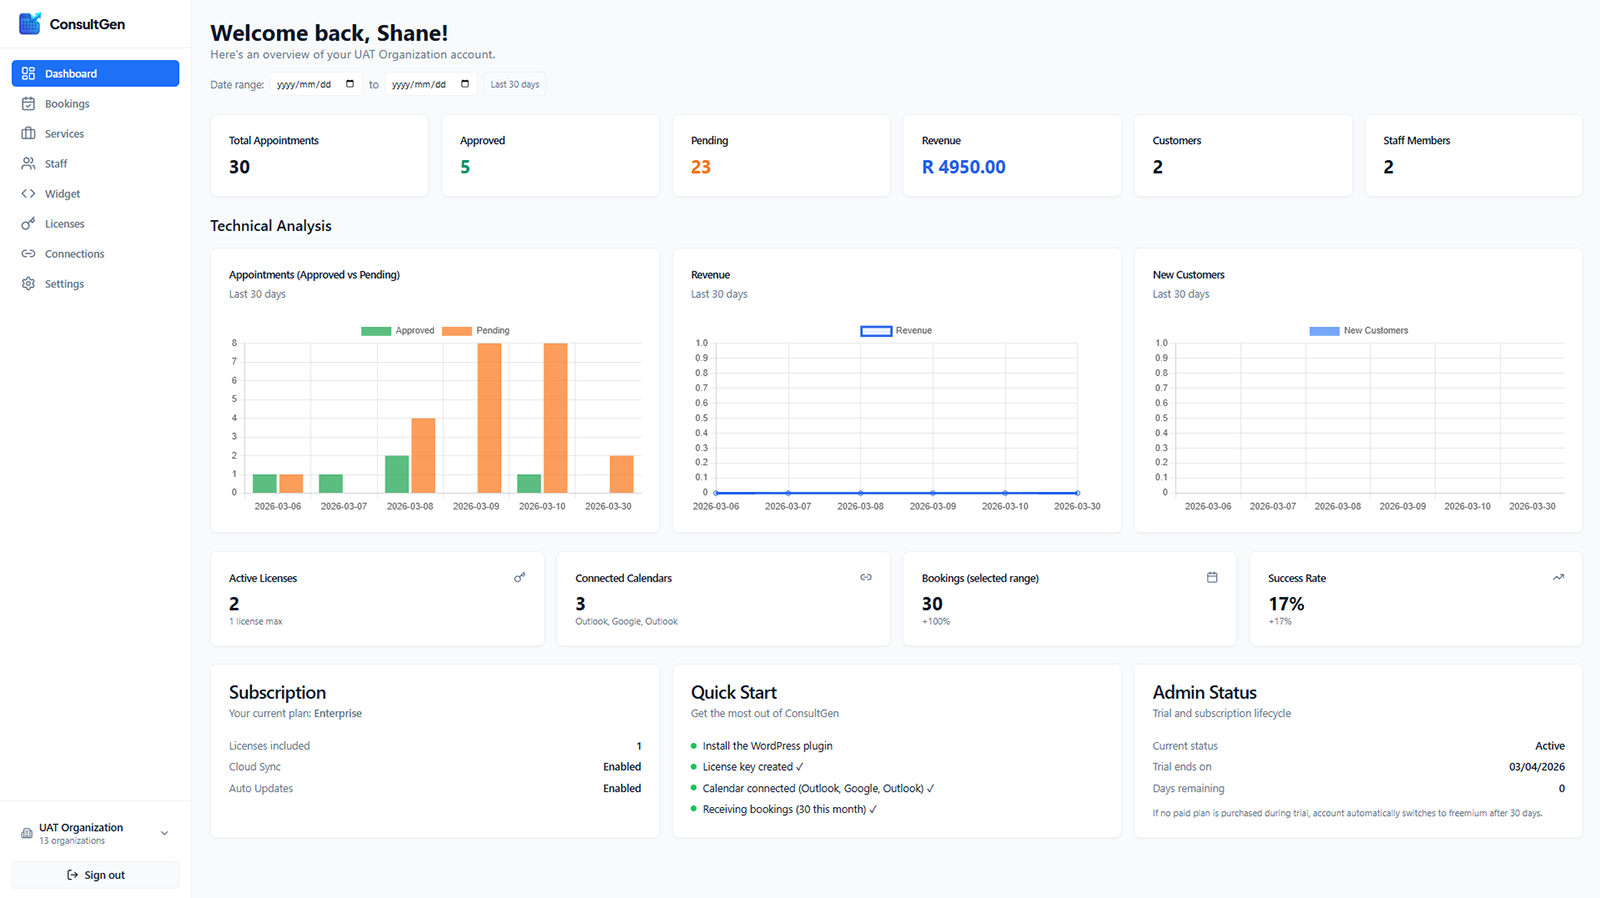
Key metrics: your business at a glance
- Total Appointments shows overall booking demand for the selected period.
- Approved shows confirmed appointments that are moving toward delivery and payment.
- Pending shows appointment requests waiting for review. A high pending count usually means revenue is being delayed.
- Revenue shows the value generated by approved appointments in the selected range.
- Customers shows how many unique clients booked with you, helping you distinguish acquisition from repeat business.
- Staff Members shows your active scheduling capacity.
Technical Analysis: visualizing your trends
The charts help you interpret performance instead of only reading totals.
- Appointments (Approved vs Pending) highlights approval backlog and booking surges.
- Revenue shows whether income is rising, flat, or declining.
- New Customers shows whether you are still attracting first-time clients.
If you see tall pending bars, a flat revenue line, or long stretches with no new customers, your next action is usually operational, not cosmetic.
Account status cards: system health checks
- Active Licenses tells you whether you have room to grow your team.
- Connected Calendars confirms that Google, Outlook, or Office 365 integrations are syncing correctly. This is essential for avoiding double-bookings.
- Bookings (selected range) gives you a quick comparison against the previous period.
- Success Rate tells you how effectively requests become completed, paid appointments.
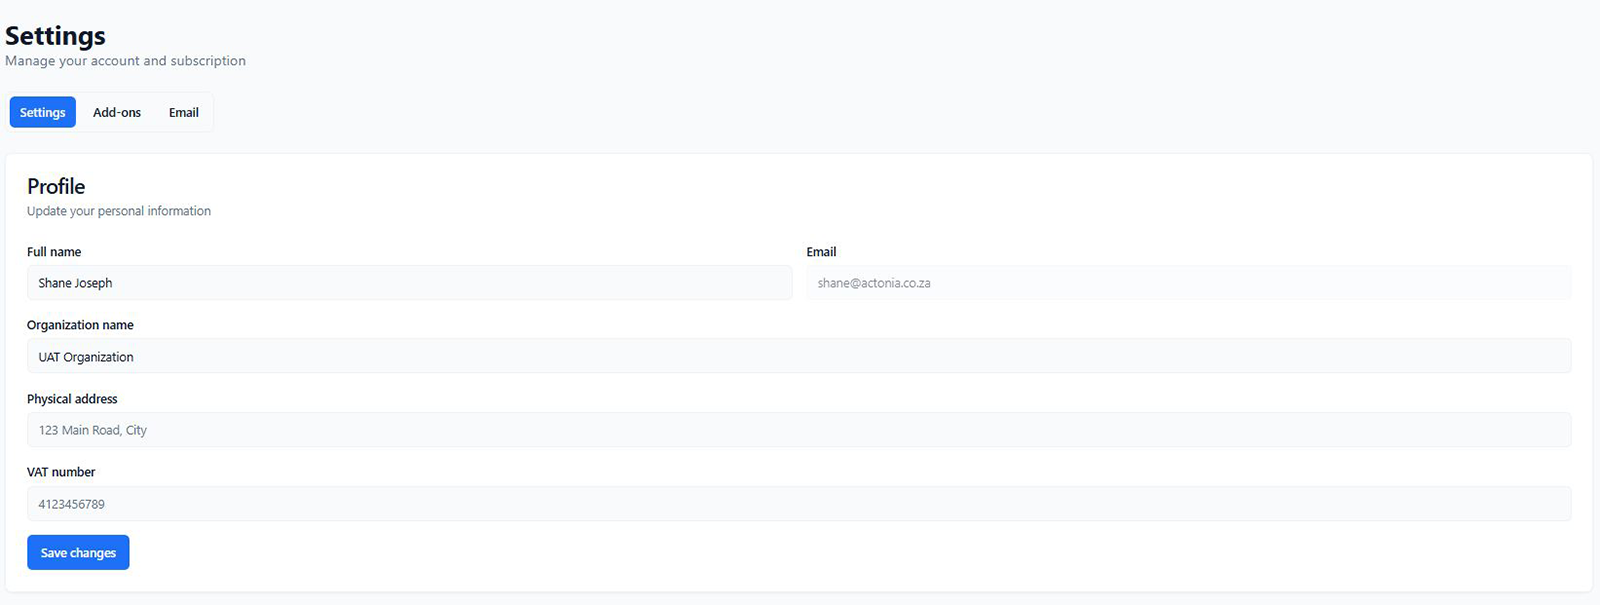
Subscription and onboarding
The bottom cards answer account-level questions.
- Subscription shows plan level and included features.
- Quick Start shows whether key setup steps are complete.
- Admin Status shows trial or subscription lifecycle information.
Together, these cards help you decide whether to finish setup, protect continuity, or invest in growth.
What to do next
- If pending bookings are high, go to Bookings and clear the queue.
- If revenue is flat, review New Customers and your service offer.
- If you are getting double-booked, verify calendar connections first.
- If you need more team capacity, check licenses before adding staff.
Frequently asked questions
- Why do my dashboard numbers not match my bank account? Revenue usually reflects approved appointments, not necessarily settled cash.
- Why does success rate matter? It measures whether your booking lifecycle is converting interest into completed, paid work.
- What should I check first when something looks wrong? Confirm the organization, then confirm the date range, then confirm your calendar connection.