Documentation

Create and configure services

Define what customers can book, how long each session lasts, and which optional settings should appear in the booking flow.

Services overview

Review your current service list, pricing, and the structure of your bookable offerings.

  • Last updated: March 30, 2026
  • Reading time: 2 minutes
  • Difficulty: Beginner
ConsultGen services overview

Why this matters for your business: Your Services page is your digital storefront. By clearly defining what you offer—along with the price, duration, and capacity—you eliminate back-and-forth messaging with clients. A well-organized service list builds professional trust and ensures your automated booking system only schedules exactly what you can handle.

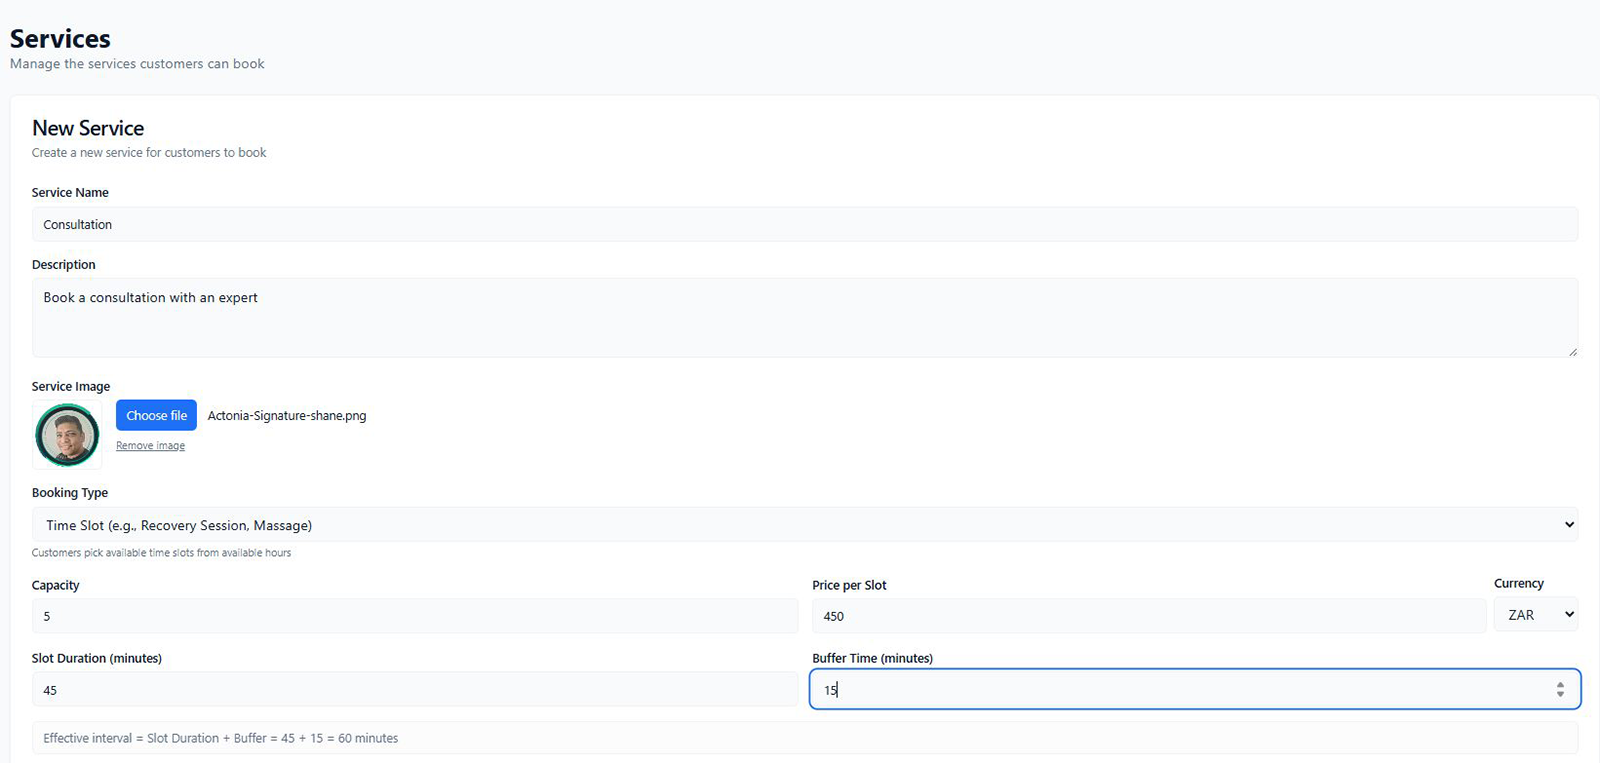
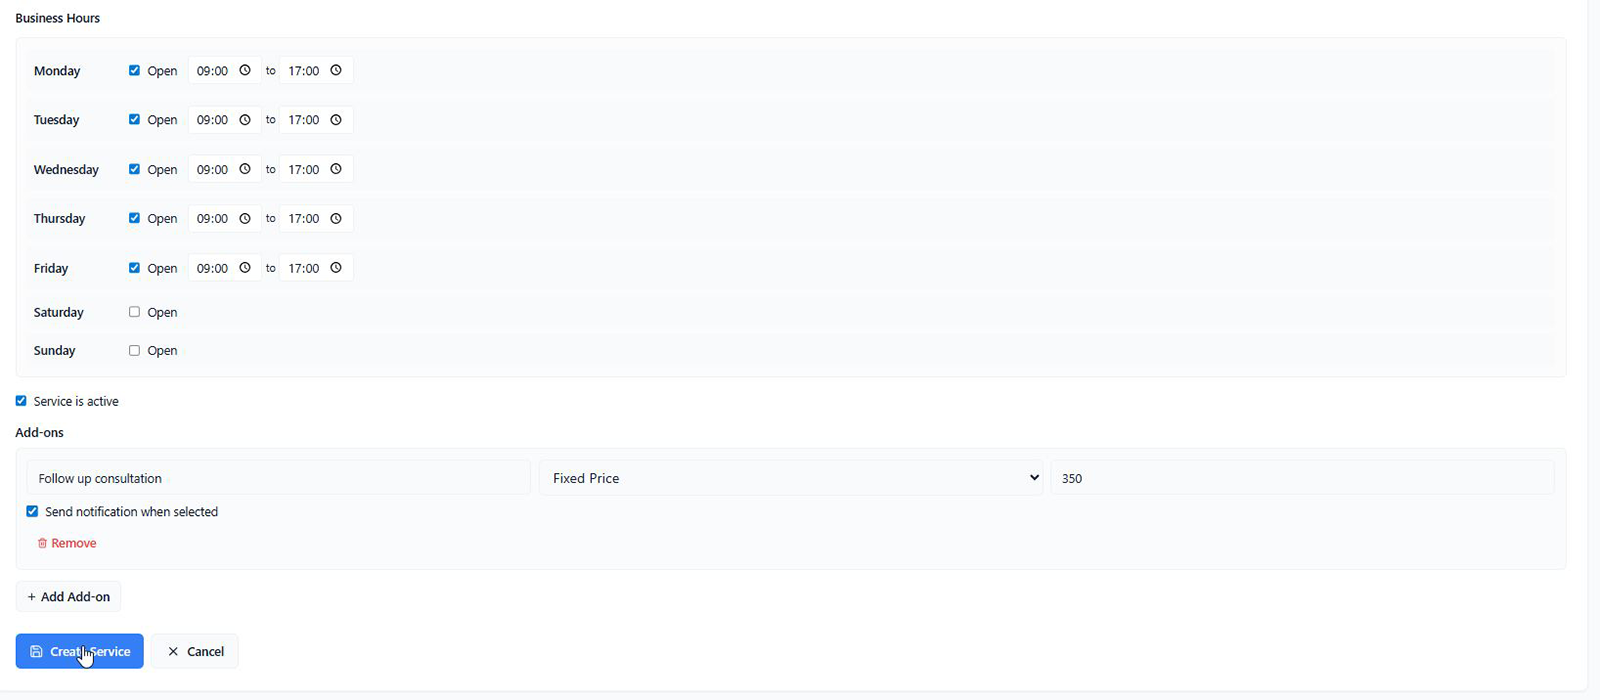
1. Add a New Service

Ready to offer something new? Click the primary blue + Add Service button in the top right corner. This allows you to build a new offering from scratch, whether it is a quick 15-minute consultation, a 2-hour salon treatment, or an all-day pass.

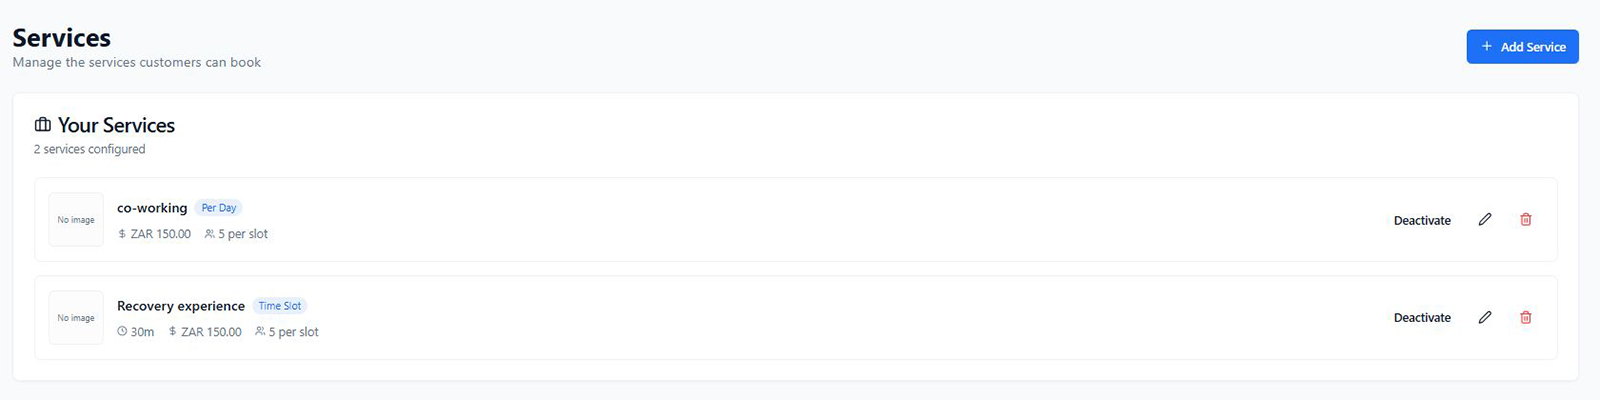
2. Review Your Service List

The "Your Services" section displays everything your clients can currently book. At a glance, you can verify the most important details for each offering:

  • Booking Type: Notice the blue badges next to your service names. You can offer Time Slot bookings (like a 30-minute "Recovery experience") or Per Day bookings (like "co-working").
  • Duration & Price: Ensure your clients know exactly what to expect. You will see the time commitment (e.g., 30m) and the cost (e.g., ZAR 150.00) clearly listed.
  • Capacity: Do you run group sessions? The person icon shows your capacity limit (e.g., "5 per slot"), ensuring you never overbook a class or shared space.

3. Manage and Update Quickly

Business changes, and your services should too. On the right side of every service, you have three quick actions:

  • Deactivate: Temporarily hide a service from your booking widget without deleting it entirely (perfect for seasonal offerings).
  • Edit (Pencil Icon): Need to raise your prices or change a description? Click here to tweak the details.
  • Delete (Trash Icon): Permanently remove an old service you no longer offer.

Add a service

Create a new service with its core details, timing, and scheduling rules.

  • Last updated: March 30, 2026
  • Reading time: 2 minutes
  • Difficulty: Beginner
ConsultGen add service form

Why This Matters

Your Services page is the foundation of your appointment scheduling software setup. When this form is configured correctly, your automated booking system can show accurate options, prevent scheduling conflicts, and help reduce client no-shows.

For busy service professionals, this means less admin and a smoother booking lifecycle. Clients can choose a service, view live availability, and book quickly through your client booking widget. A strong setup also improves calendar sync for professionals who depend on reliable time blocking.

Step 1: Enter Service Name and Description

Use clear, client-friendly wording so people immediately understand what they are booking.

  • Service Name example: Consultation
  • Description example: Book a consultation with an expert

Tip: Keep names specific and action-oriented.

Step 2: Add or Update a Service Image

In the Service Image area, you can:

  • Upload a file with Choose file
  • Preview the selected image
  • Remove image if you want to replace it

A relevant image strengthens brand trust and improves service selection confidence.

Step 3: Select Booking Type

Choose the scheduling model that fits your service.

Current option shown:

  • Time Slot (e.g., Recovery Session, Massage)

This mode lets customers pick from available time slots during your configured hours.

Step 4: Set Capacity, Price, and Currency

Configure your commercial and operational limits:

  • Capacity: 5
  • Price per Slot: 450
  • Currency: ZAR

Capacity prevents overbooking. Accurate pricing and currency improve transparency and reduce payment confusion.

Step 5: Configure Slot Duration and Buffer Time

Set timing details carefully:

  • Slot Duration: 45 minutes
  • Buffer Time: 15 minutes

ConsultGen calculates:

  • Effective interval = 60 minutes

Why this matters: the effective interval controls real spacing on your calendar, helping your team stay on schedule and improving the overall client experience.

Step 6: Review and Save

Before saving, confirm:

  • Service name and description are correct
  • Booking type matches your process
  • Price, currency, and capacity are accurate
  • Duration and buffer produce the expected effective interval

Then save and run a quick booking test through your client booking widget.

Enable service add-ons

Finish the setup with optional configuration that changes how customers book the service.

  • Last updated: March 31, 2026
  • Reading time: 2 minutes
  • Difficulty: Beginner
ConsultGen add service advanced settings

How to Set Business Hours and Premium Add-ons for a Service

Last Updated: March 30, 2026
Reading Time: 5 minutes
Difficulty: Intermediate

Why This Matters

This part of ConsultGen controls when clients can book and what optional extras they can choose. A clean setup improves your booking lifecycle, keeps your client booking widget accurate, and helps your automated booking system run without manual intervention.

For busy service professionals, this means fewer booking errors, better calendar sync for professionals, and stronger revenue from premium add-ons.

Plan Requirement

Premium add-ons are available for Professional plans and above.

Step 1: Configure Business Hours

In the Business Hours section, set availability per day:

  • Enable Open for days you accept bookings
  • Set start and end times for each open day
  • Leave closed days unchecked

Example setup:

  • Monday to Friday: 09:00 to 17:00
  • Saturday and Sunday: closed

Step 2: Keep the Service Active

Enable Service is active to make this service bookable.

Use this as your publish control if you need to pause or relaunch a service quickly.

Step 3: Add a Premium Add-on

Inside Add-ons, define the optional extra:

  • Add-on name, such as Follow up consultation
  • Pricing type, such as Fixed Price
  • Add-on amount, such as 350
  • Notification option, such as Send notification when selected

Step 4: Manage Add-ons

  • Use Add Add-on to create more optional extras
  • Use Remove to delete an add-on from this service

Step 5: Create the Service

  • Click Create Service to save
  • Click Cancel to exit without creating

Before saving, confirm:

  • Business hours are correct
  • Service is active if it should be live
  • Add-on pricing and notifications are set correctly
Back to Core Features